Orchestrating Super Mario Bros. Game Deployment on Amazon EKS Cluster with EKS Blueprints for AWS CDK
Step-by-step guidance on utilizing EKS Blueprints with IaC framework for AWS CDK featuring the nostalgic Super Mario Bros. game example.
Introduction
In this blog, we will show how to use Amazon EKS Blueprints for AWS CDK to deploy a dockerized Super Mario Bros. game on Amazon EKS Cluster in under 20 minutes. This blog explains how to automate the deployment and easily bootstrap an EKS cluster with Amazon EKS add-ons like Kubernetes Manifests, Amazon VPC CNI and AWS Load Balancer Controller.
Before we get started here are some prerequisites for this tutorial:
a. Setup AWS CDK:
If you haven’t here’s a tldr on how to do it:
- Set up AWS CLI on your computer
- Install Node.js, npm & Typescript
- Install the AWS CDK with
npm i -g aws-cdk@2.115.0 - Bootstrap CDK with:
cdk bootstrap aws://ACCOUNT-NUMBER/REGION - Install the clients and support tools
Refer the guide here on EKS Blueprints CDK Project Setup, since the latest supported aws-cdk version v2.115.0 for EKS Blueprints might change from time to time.
b. Setup IAM Roles:
The EKS Blueprint uses the aws-auth ConfigMap as the default authentication mode for Amazon EKS clusters. Although, you can use the EKS Blueprint to automatically create the IAM Roles, we will show how to use existing IAM roles for accessing the EKS Cluster:
1) IAM Role #1: For accessing the Kubernetes resources on EKS Cluster using kubectl, the kubernetes command line tool. We will set this IAM role in an environment variable called MASTERS_ROLE_ARN.
2) IAM Role #2: For accessing the Kubernetes resources on EKS Cluster resources using AWS Management console. We will set this IAM role in an environment variable called USER_ROLE_ARN. To view the Resources tab and Nodes section on the Compute tab in the AWS Console, this IAM role must have specific IAM and Kubernetes permissions. For more information, see Required permissions.
The role ARNs can’t include a path such as role/my-team/developers/my-role. The format of the ARNs must be arn:aws:iam::111122223333:role/my-role. In this example, my-team/developers/ needs to be removed.
Once you have the IAM roles ready, export them on either Windows or Linux using the following commands (replace the AWS account id 1234567890 and role names in the example ARN):
For Windows:
set MASTERS_ROLE_ARN=arn:aws:iam::1234567890:role/mastersRoleArn
set USER_ROLE_ARN=arn:aws:iam::1234567890:role/userRoleArn
For Linux:
export MASTERS_ROLE_ARN=arn:aws:iam::1234567890:role/mastersRoleArn
export USER_ROLE_ARN=arn:aws:iam::1234567890:role/userRoleArn
Implementation
The CDK code for this solution architecture is available in our GitHub repository. To begin, you can clone the repository to your local terminal and install the necessary npm packages with these commands:
git clone https://github.com/awsdataarchitect/mario-eks-app-cdk.git && cd mario-eks-app-cdk
npm i
CDK Application
The CDK entry point is bin/mario-eks.ts that orchestrates the initialization of the CDK application, sets up the environment, instantiates the necessary stacks, and establishes dependencies between them.
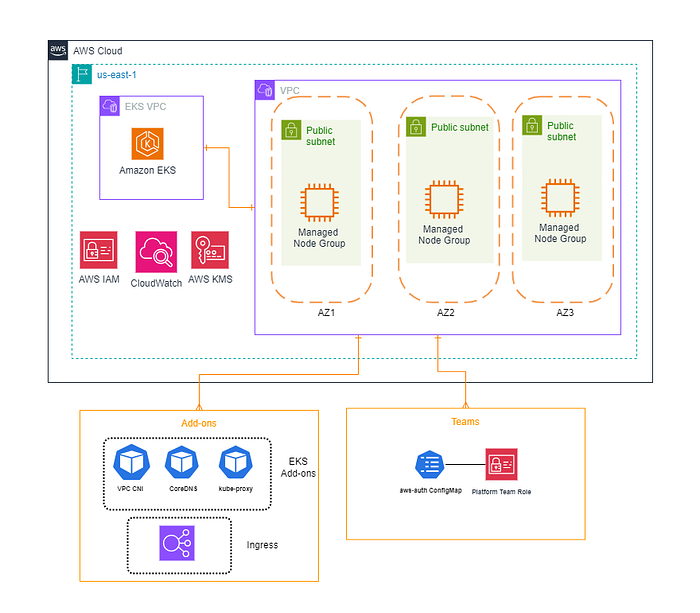
We have 3 stacks in this CDK project:
- mario-vpc-stack : This stack provisions a new VPC with Public Subnets in 3 Availability Zones, Route Tables, Security Groups, Network ACLs and Internet Gateway.
- mario-eks-stack : This stack contains the EKS Blueprint for bootstrapping the EKS cluster with Managed Node Groups (1 spot EC2 instance of instance type t3-medium), Add-ons (Amazon VPC CNI and AWS Load Balancer Controller) and onboarding a Team with admin access (masters group) to the cluster.
- mario-manifests : This stack is implemented as a ClusterAddon within the parent stack (#2 mario-eks-stack). It contains the in-line YAML manifests for 3 Kubernetes resources — Deployment, Service and Ingress.
Now lets dive deep into each of these stacks used in our project.
- mario-vpc-stack : Below cdk snippet creates a VPC named ‘MarioVpc’ with the CIDR block ‘10.7.0.0/16’ (you can use a different CIDR range according to your needs). It also create 3 public subnets spanning across three AZs, using a CIDR mask of /24. All the required VPC networking components like route tables, default security group and default Network ACLs are automatically created by this code snippet.
   this.eksvpc =  new ec2.Vpc(this, 'MyVpc', {
    vpcName: 'MarioVpc',
    cidr: '10.7.0.0/16',
    maxAzs: 3, // Use 3 availability zones
    subnetConfiguration: [
      {
        cidrMask: 24,
        name: 'MarioPublicSubnet',
        subnetType: ec2.SubnetType.PUBLIC,
      },
    ],
  });
Note: The EKS Blueprint by default creates a Well-Architected VPC with both Public and Private subnets (3 each), 3 NAT gateways and Elastic IPs. However, we do not need all this infrastructure for our Super Mario Bros. game demo. This is why we create our own VPC using a separate stack (mario-vpc-stack.ts) and we have better control and customization of subnets where we want to deploy the EKS cluster. If you intend to utilize Fargate managed worker nodes within the EKS Cluster, then you need to add private subnets to your VPC. The reason being that the AWS Managed Fargate nodes are not supported in public subnets in the context of EKS Cluster.
Next, we need to apply the tag (kubernetes.io/role/elb=1) to each public subnet for the automatic subnet discovery by AWS Load Balancer Controller.
// Get the public subnets
  const publicSubnets = this.eksvpc.publicSubnets;

  // Apply tags to the public subnets
  publicSubnets.forEach((subnet, index) => {
    cdk.Tags.of(subnet).add('kubernetes.io/role/elb', '1');
    // Add other tags as needed
  });
If the tag is missing, then you would get following errors when creating the Kubernetes service or the ingress resource that provisions an Application Load Balancer (ALB) in AWS.
"error"="failed to build LoadBalancer configuration due to retrieval of subnets failed to resolve 3 qualified subnets. Subnets must contain the kubernetes.io/cluster/\u003ccluster name\u003e tag with a value of shared or owned and the kubernetes.io/role/elb tag signifying it should be used for ALBs Additionally, there must be at least 3 subnets with unique availability zones as required by ALBs. Either tag subnets to meet this requirement or use the subnets annotation on the ingress resource to explicitly call out what subnets to use for ALB creation. The subnets that did resolve were []" "controller"="alb-ingress-controller" "request"={"Namespace":"default","Name":"mario-ingress"} Warning CreatingLoadBalancerFailed 9s (x2 over 14s) service-controller Error creating load balancer (will retry): failed to ensure load balancer for service default/mario-service: could not find any suitable subnets for creating the ELB2. mario-eks-stack : Below snippet defines an interface ClusterProps extending cdk.StackProps that includes a property eksvpc representing the VPC used by the EKS cluster. We have created an interface as we need to pass the VPC from the mario-vpc-stack. Alternately, we can also use SSM parameter or cdk.Fn.importValue(‘MarioVpcId’) to import the VPC using ec2.Vpc.fromLookup method.
interface ClusterProps extends cdk.StackProps {
  eksvpc: ec2.IVpc,
}
Next, we define variables for the ARNs of IAM roles (mastersRoleArn and userRoleArn) and the instance type for spot instance (workerSpotInstanceType).
const mastersRoleArn = process.env.MASTERS_ROLE_ARN || 'arn:aws:iam::1234567890:role/mastersRoleArn';
const userRoleArn = process.env.USER_ROLE_ARN || 'arn:aws:iam::1234567890:role/userRoleArn';
const workerSpotInstanceType = 't3.medium';
Then, we create an array of EKS add-ons, including the AWS Load Balancer Controller and Amazon VPC CNI. We also include custom manifests using marioManifests.
const addOns: Array<blueprints.ClusterAddOn> = [
  new blueprints.addons.AwsLoadBalancerControllerAddOn(),
  new blueprints.addons.VpcCniAddOn(),
  new marioManifests,
];
In the next snippet, we create an EKS cluster provider using the GenericClusterProvider from EKS Blueprints. We specify Kubernetes version, tags, and other configurations. Amazon EKS currently supports the latest Kubernetes version 1.29. However, as of writing this blog, AWS EKS CDK support for V1_29 is still pending release. In our project, we are utilizing version 1.28 in our EKS cluster configuration. You can also customize the other properties like mastersRole, managedNodeGroups and EKS Cluster role settings as per your requirement.
const clusterProvider = new blueprints.GenericClusterProvider({
    version: eks.KubernetesVersion.V1_28,
    tags: {
        'Name': 'mario-cluster',
    },
    mastersRole: blueprints.getResource(context => {
        return iam.Role.fromRoleArn(context.scope, 'MastersRole', mastersRoleArn, {
            mutable: true, // Set to true if you need to update the role
        })

    }),
    managedNodeGroups: [{
        id: 'mng1-launchtemplate',
        instanceTypes: [new ec2.InstanceType(workerSpotInstanceType)],
        amiType: eks.NodegroupAmiType.AL2_X86_64,
        nodeGroupCapacityType: eks.CapacityType.SPOT,
        desiredSize: 1,
        minSize: 0,
        maxSize: 1,
        nodeGroupSubnets: { subnetType: ec2.SubnetType.PUBLIC },
    }
    ],
    privateCluster: false,
    vpcSubnets: [{ subnetType: ec2.SubnetType.PUBLIC }],
    role: blueprints.getResource(context => {
        return new iam.Role(context.scope, 'AdminRole',
            {
                assumedBy: new iam.ServicePrincipal('eks.amazonaws.com'),
                managedPolicies: [
                    iam.ManagedPolicy.fromAwsManagedPolicyName('AmazonEKSClusterPolicy'),
                    iam.ManagedPolicy.fromAwsManagedPolicyName('AmazonEC2ContainerRegistryReadOnly'),
                ],
            });
    }),
});
Next, we create a platform team with the name ‘platform-admin’ and associate it with the user role defined earlier.
const platformTeam = new blueprints.PlatformTeam({
  name: ‘platform-admin’,
  userRoleArn: userRoleArn,
});
Finally, we use the EksBlueprint builder to set up the EKS cluster. Specify the AWS region, add-ons, cluster provider, teams, and VPC provider. The build method is then invoked to deploy the cluster.
blueprints.EksBlueprint.builder()
  .region(process.env.CDK_DEFAULT_REGION)
  .addOns(...addOns)
  .clusterProvider(clusterProvider)
  .teams(platformTeam)
  .resourceProvider(blueprints.GlobalResources.Vpc,
    new blueprints.DirectVpcProvider(props.eksvpc))
  .build(this, 'mario-cluster');
3. mario-manifests : This stack is imported and instantiated in the mario-eks-stack and it encapsulates the KubernetesManifest that represents the manifests deployed on the Kubernetes cluster. The class marioManifests implements the blueprints.ClusterAddOn interface, indicating that it serves as an add-on for our AWS EKS cluster.
export class marioManifests implements blueprints.ClusterAddOn {
  deploy(clusterInfo: blueprints.ClusterInfo): void {

    const cluster = clusterInfo.cluster;
Deployment Manifest:
The deploymentManifest section defines a Kubernetes Deployment resource, specifying details such as the number of replicas, and other configurations related to the deployment like container image (special thanks to Pavel ‘PK’ Kaminsky, the creator of the Docker image kaminskypavel/mario on Docker Hub). The blueprints.utils.loadYaml function is used to load this YAML manifest into a format compatible with the AWS CDK. These manifests are deployed to the EKS cluster using the eks.KubernetesManifest construct, creating the necessary Kubernetes resources for the Super Mario Bros. game.
// Inline YAML manifest for Deployment
    const deploymentManifest = `---
    apiVersion: apps/v1
    kind: Deployment
    metadata:
      name: mario-deployment
    spec:
      replicas: 2
      selector:
        matchLabels:
          app: mario-app
      template:
        metadata:
          labels:
            app: mario-app
        spec:
          containers:
          - name: mario-container
            image: kaminskypavel/mario

    `;
    let manifest = deploymentManifest.split("---").map(e => blueprints.utils.loadYaml(e));

    new eks.KubernetesManifest(cluster.stack, "deployment-manifest", {
      cluster,
      manifest,
      overwrite: true
    });
Service Manifest:
The serviceManifest section defines a Kubernetes Service resource. This resource allows communication to the application pods from within the cluster. It exposes port 80 and targets container port 8080 for the mario-service.
Note: Please be aware that using the service type of LoadBalancer in Kubernetes will create a Classic Load Balancer in AWS. As of now, this type of Load Balancer is deprecated by AWS. To utilize the modern Application Load Balancer (ALB), it is recommended to use the service type of NodePort (see “type: NodePort” in the below snippet) and configure an Ingress resource through the Ingress Manifest.
    // Inline YAML manifest for Service
    const serviceManifest = `---
    apiVersion: v1
    kind: Service
    metadata:
      name: mario-service
    spec:
      selector:
        app: mario-app
      ports:
        - protocol: TCP
          port: 80
          targetPort: 8080
      type: NodePort
    `;

    manifest = serviceManifest.split("---").map(e => blueprints.utils.loadYaml(e));

    new eks.KubernetesManifest(cluster.stack, "service-manifest", {
      cluster,
      manifest,
      overwrite: true
    });
Ingress Manifest:
The ingressManifest section defines a Kubernetes Ingress resource. Ingress allows external access to services within the cluster. This particular manifest sets up an Internet-facing ALB using annotations alb.ingress.kubernetes.io/scheme: internet-facing. It routes traffic to the mario-service exposed on port 80.
// Inline YAML manifest for Ingress
  const ingressManifest = `---
  apiVersion: networking.k8s.io/v1
  kind: Ingress
  metadata:
    name: mario-ingress
    namespace: default
    annotations:
      alb.ingress.kubernetes.io/scheme: internet-facing
  spec:
    ingressClassName: alb
    rules:
      - http:
          paths:
            - path: /
              pathType: Prefix
              backend:
                service:
                  name: mario-service
                  port:
                    number: 80
  `;

  manifest = ingressManifest.split("---").map(e => blueprints.utils.loadYaml(e));

  new eks.KubernetesManifest(cluster.stack, "ingress-manifest", {
    cluster,
    manifest,
    overwrite: true
  });

}
Deploying the Stack
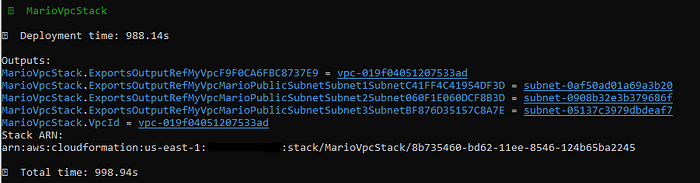
Deploy the stack using the command cdk deploy --alland confirm the deployment by typing “y” and hitting Enter. CDK will create resources based on your code. After completion, it provides a summary. Check the AWS CloudFormation console for stack details to verify the provisioned resources.
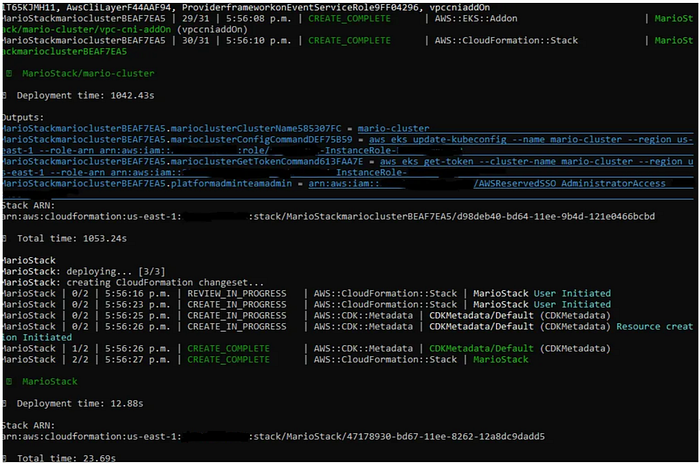
Note: Modify CDK code for infrastructure changes and redeploy as needed.
Testing and Validation
If the CDK deployment was successful, you will see an aws eks update-kubeconfig command in the above output section to configure “kubectl” for the newly created EKS cluster.
aws eks update-kubeconfig --name mario-cluster --region us-east-1 --role-arn arn:aws:iam::1234567890:role/mastersRoleArnIf your AWS credentials are configured with the correct permissions, the config file will be successfully updated :
Updated context arn:aws:eks:us-east-1:1234567890:cluster/mario-cluster in C:\Users\awsuser\.kube\configYou can run below command to verify all Kubernetes resources are deployed successfully.
kubectl get allYou should see the Pods, Service, Deployment and ReplicaSet as shown below:
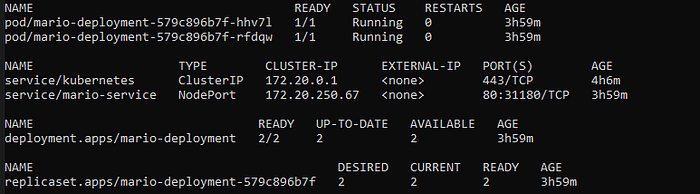
You can get the ALB DNS Name by describing the ingress resource:
kubectl describe ingress mario-ingressYou should see the output below and you can now note down the “Address:” field that contains the complete ALB URL from where the Super Mario Bros. game can be accessed in your browser.
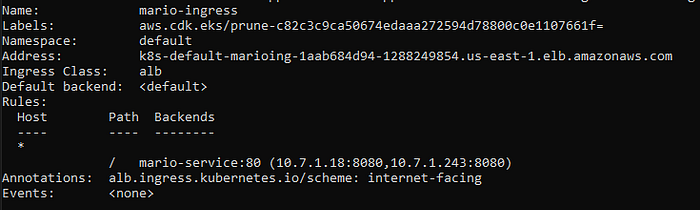
With this, we have completed the validations using the IAM Role #1 using kubectl. Now, lets validate the IAM Role #2 using AWS Management Console.
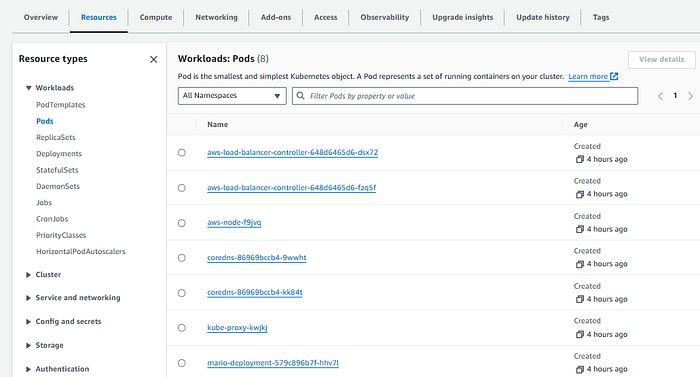
Verify the EKS Cluster is active from the EKS Console by signing on with IAM Role #2:

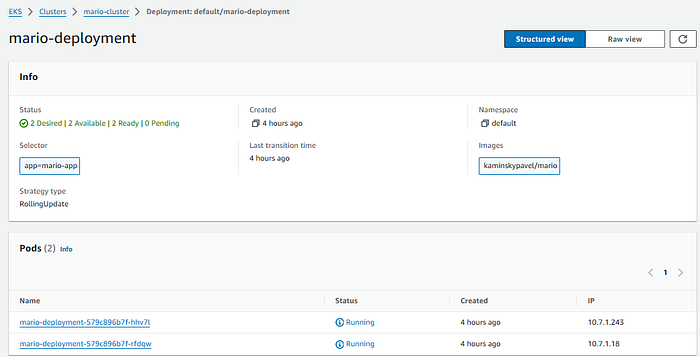
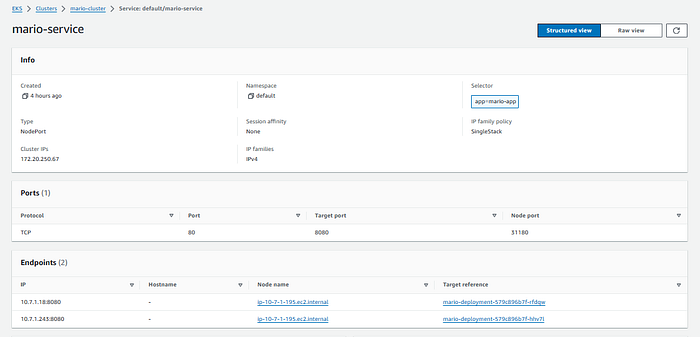
Verify that you can see the Pods, Deployment, Service and Ingress Resources from the Resources tab.
Pods:
Deployment:
Service:
Ingress:
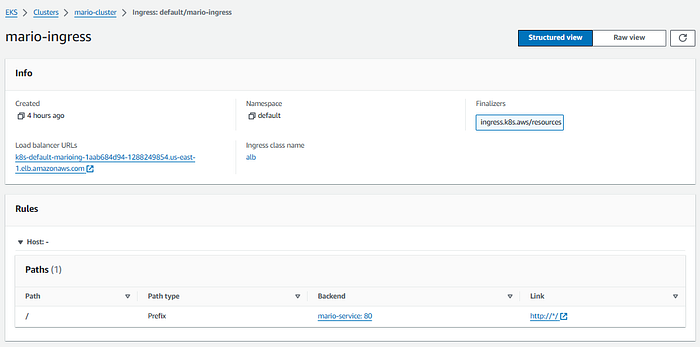
Note that you can find the same ALB URL on the Ingress screen, which you can use to launch the Super Mario Bros. game.
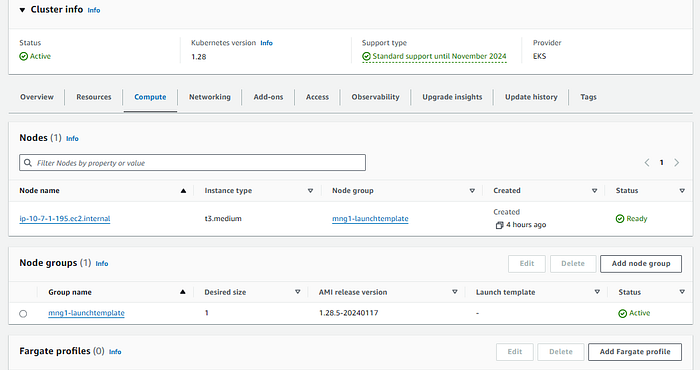
Also, verify that you can see the Managed Group and the Worker node details in the Compute tab as shown below:
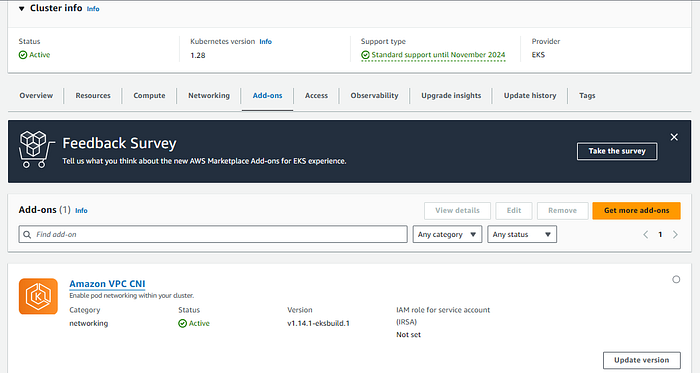
Finally, verify that the Amazon VPC CNI add-on is enabled and active in the Add-ons tab:
Now its time to launch the game using the ALB URL in your browser:
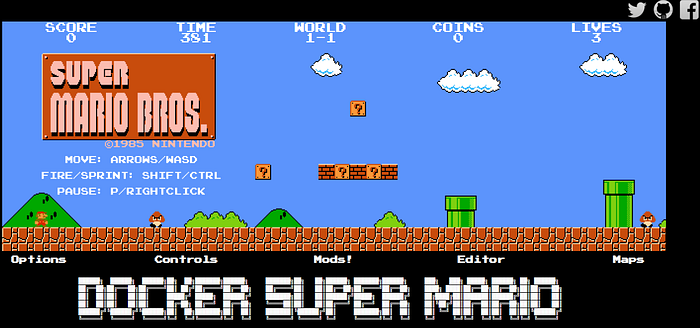
Happy gaming!
Pricing
Amazon EKS cluster is billed at $0.10 per hour. If you are using Amazon EC2 Spot Instance (with Amazon EKS managed node group), you are billed for AWS resources (e.g., EC2 instances, Amazon Elastic Block Store (EBS) volumes) you create to run your Kubernetes worker node. Also, if you are using ALB, Elastic IPs or NAT gateways (provisioned when using private subnets), you are billed for those resources as well. Keep in mind of these costs and refer to the AWS Pricing page for up to date pricing information.
Clean-up
To delete all the resources simply run the cdk destroy --all command. By running this command, you ensure the complete removal of the defined resources, freeing up any allocated resources and eliminating associated costs. Note that currently, KMS keys and CloudWatch log groups cannot be deleted with this command, and need a manual cleanup for these resources.
Conclusion
This tutorial serves as a concise guide for seamlessly provisioning an EKS Cluster using EKS Blueprints for AWS CDK with the required Kubernetes EKS add-ons (Amazon VPC CNI and AWS Load Balancer Controller) and the Kubernetes manifests YAML files (Deployment, Service, Ingress) to launch the Dockerized version of the popular Super Mario Bros. game.
In Plain English 🚀
Thank you for being a part of the In Plain English community! Before you go:
- Be sure to clap and follow the writer ️👏️️
- Follow us: X | LinkedIn | YouTube | Discord | Newsletter
- Visit our other platforms: Stackademic | CoFeed | Venture
- More content at PlainEnglish.io